Table of Contents
- Installation
- Database: using MySQL or PostgreSQL instead of Sqlite (optional)
- Automatic startup
- TLS setup and LetsEncrypt certificate automation
- Fail2ban configuration for M/Monit
Installation
Generic cross-platform installation
To install M/Monit:
- First, check that M/Monit is supported on your OS platform
- Get the latest release from https://mmonit.com/download/
- Download and unpack the tar.gz file in a directory, any directory will do, but unpacking in /opt or /usr/local are good choices. Example:
tar -xzf mmonit-4.0.0-linux-x64.tar.gz
- Go to the unpacked mmonit-<version> directory
- Before the first M/Monit start, set new passwords for default users (optional):
    ./bin/mmonit-admin password admin
    Please enter the new password (maximum 128 characters): ******
    Enter the password again for confirmation: ******
    Password successfully updated!

    ./bin/mmonit-admin password monit
    Please enter the new password (maximum 128 characters): ******
    Enter the password again for confirmation: ******
    Password successfully updated!
- Run M/Monit using:
./bin/mmonit
- Point your browser to the host where mmonit is installed (or "localhost" if running on the same machine), for instance: http://localhost:8080/ and log in as the user "admin" with the default password "swordfish" (or the password you set via mmonit-admin in the previous step).
Once started, mmonit will daemonize itself and run in the background. To stop mmonit use ./bin/mmonit stop. To see all options for the mmonit program use ./bin/mmonit -h.
You can run mmonit as any user, including root. It is not necessary to create a standalone account to run mmonit.
- M/Monit requires Monit as an agent. Please see the M/Monit Manual (page 16) on how to setup Monit to report data to M/Monit.
MacOS Installer
On macOS, M/Monit is installed via an installer package. The installer, copies M/Monit into /usr/local/mmonit as the user running the installer. Only this user can run the mmonit binary because the sqlite database in /usr/local/mmonit/db/mmonit.db can only be opened by this user due to file permissions. If you need to run mmonit as another user, just use the command line to change the owner of /usr/local/mmonit:
sudo chown -R user /usr/local/mmonit
This command will change the owner of the mmonit directory and all its files to user. Replace user with a user on your system.
Database: using MySQL or PostgreSQL instead of Sqlite (optional)
M/Monit comes bundled and configured with SQLite as its database system. No extra setup is required. If you plan to use M/Monit to monitor more than, say 40-50 hosts, you may want to use MySQL or PostgreSQL instead as these database systems are faster and scale much better. If in doubt, start with SQLite.
If you later should want to switch to MySQL or PostgreSQL, you can use the migrate script in the mmonit/db directory to move your SQLite data over to MySQL or PostgreSQL.
Follow these steps to configure M/Monit to use either MySQL or PostgreSQL:
- Create the M/Monit database
The database schemas can be found in mmonit/db/ Use one of the following recipes:
MySQL:
 1) Create the mmonit database: mysqladmin create mmonit -u root -p
 2) Create the mmonit user and grant access to the mmonit database:
     CREATE USER mmonit@localhost IDENTIFIED BY '<password>';
     GRANT ALL ON mmonit.* to mmonit@localhost;
     FLUSH PRIVILEGES;
 3) Create the schema: mysql -u mmonit mmonit -p < mmonit-schema.mysql
PostgreSQL:
 1) Create a mmonit postgres user: createuser -U postgres -P mmonit
 2) Create the mmonit database: createdb -U postgres -E utf8 -O mmonit mmonit
 3) Create the schema: psql -U mmonit mmonit < mmonit-schema.postgresql
- Configure M/Monit
Edit the M/Monit configuration file conf/server.xml and replace the SQLite <Realm> element with either:
This one for MySQL:
 <Realm url="mysql://mmonit:mmonit@127.0.0.1:3306/mmonit"
       minConnections="5"
       maxConnections="30"
       reapConnections="300" />
Or this one for PostgreSQL:
 <Realm url="postgresql://mmonit:mmonit@127.0.0.1:5432/mmonit"
       minConnections="5"
       maxConnections="30"
       reapConnections="300" />
Adjust username, password, host and port number in the connection URL as required.
The URL in the <Realm> element specify a database connection on the standard URL format. The format of the connection URL is defined as: database://[user:password@][host][:port]/database[?propertyName1][=propertyValue1][&propertyName2][=propertyValue2]... Properties depends on the database server in question. If port number is omitted, the default port number for the database server is used.
Re-start M/Monit to connect to the configured database system.
Automatic startup
Using Monit
You can register M/Monit as Monit service in the Monit configuration file (/etc/monitrc):
 check process mmonit with pidfile /usr/local/mmonit/logs/mmonit.pid
   start program = "/usr/local/mmonit/bin/mmonit"
   stop program = "/usr/local/mmonit/bin/mmonit stop"
And reload monit configuration:
monit reload
Using systemd
Save this systemd unit file as /etc/systemd/system/mmonit.service
 [Unit]
 Description = Easy, proactive monitoring of Unix systems, network and cloud services
 After = network.target
 Documentation= https://mmonit.com/documentation/

 [Service]
 Type=simple
 KillMode=process
 ExecStart = /opt/mmonit/bin/mmonit -i
 ExecStop = /opt/mmonit/bin/mmonit stop
 PIDFile = /opt/mmonit/logs/mmonit.pid
 Restart = on-abnormal

 [Install]
 WantedBy = multi-user.target
Reload systemd configuration, enable M/Monit on boot and start it:
 systemctl daemon-reload
 systemctl enable mmonit
 systemctl start mmonit
Using Upstart
Configuration for upstart (older versions of Ubuntu/Debian):
Save this script as /etc/init/mmonit.conf
 # This is an upstart script to keep mmonit running.
 # Put this script here:
 #
 #   /etc/init/mmonit.conf
 #
 # and reload upstart configuration:
 #
 #   initctl reload-configuration
 #
 # You can manually start and stop monit like this:
 #
 # start mmonit
 # stop mmonit
 #

 description "M/Monit system monitoring"

 limit core unlimited unlimited

 start on runlevel [2345]
 stop on runlevel [!2345]

 expect daemon
 respawn

 exec /usr/local/mmonit/bin/mmonit

 pre-stop exec /usr/local/mmonit/bin/mmonit stop
Reload upstart configuration and start M/Monit:
 initctl reload-configuration
 start mmonit
Using rc Framework on FreeBSD
On FreeBSD you can use the rc Framework for starting M/Monit. Install M/Monit and prepare the system as follow:
- Link the M/Monit version to a common path for only updating the link not the rc script during updates.
ln -s /usr/local/mmonit-4.3.3 /usr/local/mmonit
ls -l /usr/local/mmonit
lrwxr-xr-x  1 root wheel 23 Jan  6 09:26 /usr/local/mmonit -> /usr/local/mmonit-4.3.3
Or change the path for your M/Monit directory with sysrc mmonit_path="<Your path to M/Monit>"
- Create an unprivileged user for M/Monit and match the UID from the archive
pw useradd -n mmonit -u 1002 -d /nonexistent -s /usr/sbin/nologin
- Copy the following rc script to
/usr/local/rc.d/mmonit
#!/bin/sh

# PROVIDE: mmonit
# REQUIRE: LOGIN
# KEYWORD: shutdown

. /etc/rc.subr

name="mmonit"
desc="M/Monit monitoring aggregation server for monit"
rcvar="mmonit_enable"

load_rc_config $name
: ${mmonit_enable:=no}
: ${mmonit_path=/usr/local/mmonit}

pidfile=${mmonit_path}/logs/${name}.pid

mmonit_status(){
  if [ -f $pidfile ]; then
    echo mmonit is running on pid: $(cat $pidfile)
  else
    echo mmonit is not running.
  fi
}

status_cmd=${name}_status
start_cmd="su -m mmonit -c '${mmonit_path}/bin/${name} start'"
stop_cmd="su -m mmonit -c '${mmonit_path}/bin/${name} stop'"

run_rc_command "$1"
- Set needed permissions for the rc script
chmod 755 /usr/local/etc/rc.d/mmonit - Enable autostart with
service mmonit enable
The rc script provides the following functions: service mmonit start|stop|enable|onestart|onestop|describe|status
TLS setup and LetsEncrypt certificate automation
You can use a free TLS certificate from a Certificate Authority like LetsEncrypt with M/Monit. LetsEncrypt uses the ACME protocol for automatic certificate requests and renewal, where you have to demonstrate the control over the domain (using either DNS or the web server document root).
In this article, we describe how to use the certbot utility to request and renew certificates automatically, when M/Monit is accessible from the internet. Note: You can run M/Monit on an isolated host, with different ports and can setup firewall and port forwarding accordingly.
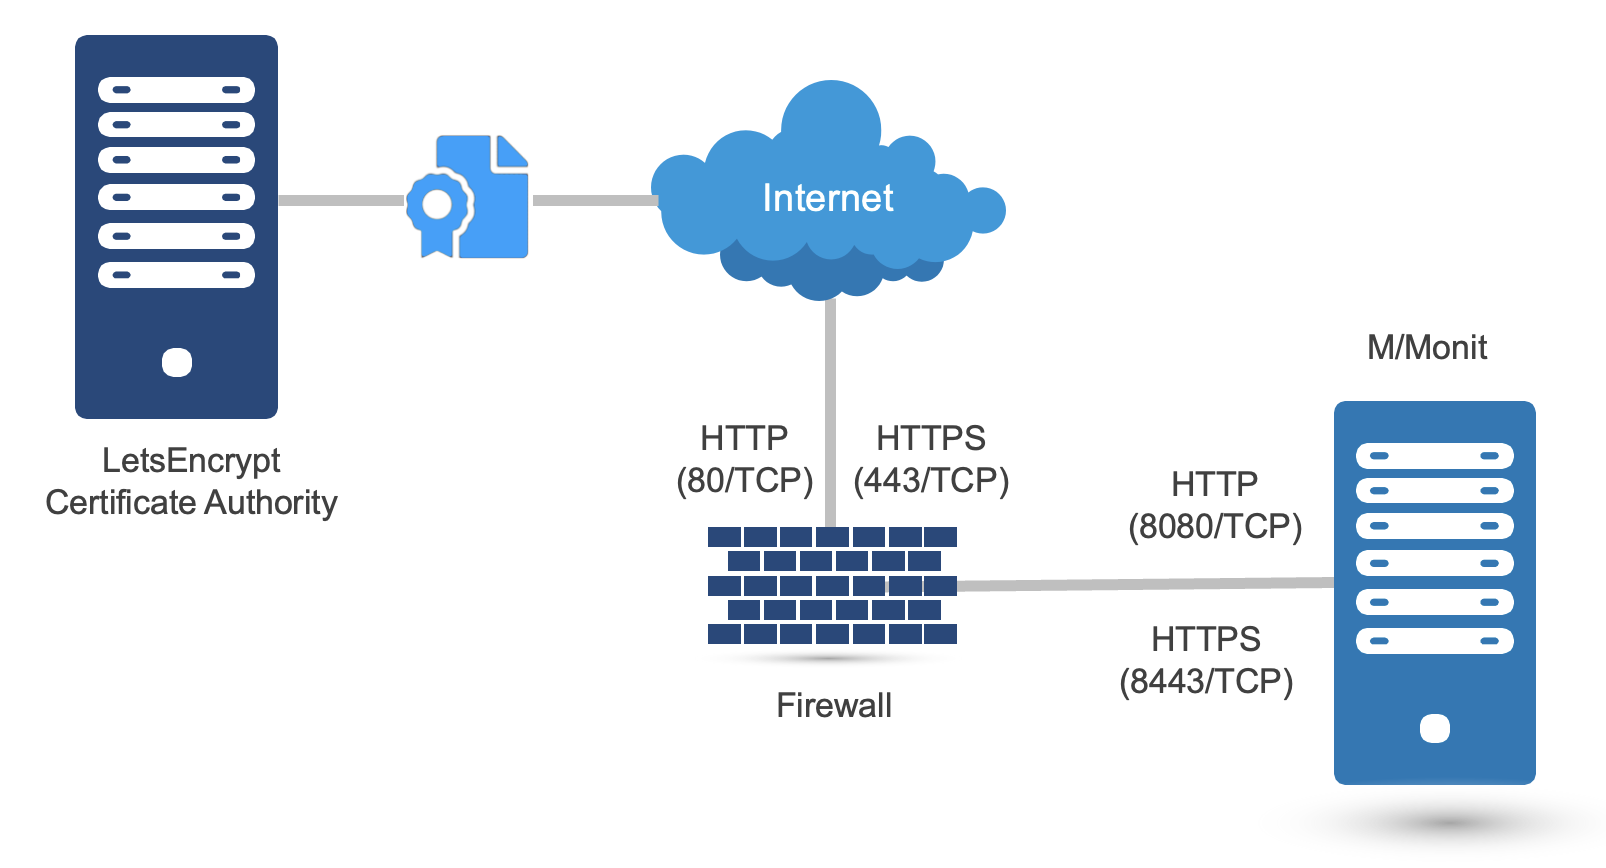
Context:
- M/Monit is running as a non-privileged user “mmonit” on ports 8080 and 8443 and installed in /home/mmonit/current
- The M/Monit process is controlled via monit (running as root user), using the following configuration (note: You can control M/Monit different way, e.g. systemd):
check process mmonit with pidfile /home/mmonit/current/logs/mmonit.pid
  start program = "/home/mmonit/current/bin/mmonit -d" as uid "mmonit" and gid "mmonit"
  stop program = "/home/mmonit/current/bin/mmonit stop" as uid "mmonit" and gid "mmonit"
- We want to allow access to the plain HTTP (80) from the internet only during the certificate request and renewal (optional).
- The user, under which M/Monit is running (“mmonit”) can control the M/Monit process, and allow access to the port 8080 on local firewall via “sudo”. Sudo configuration:
mmonit  ALL=(root) NOPASSWD: /usr/local/bin/monit restart mmonit
mmonit  ALL=(root) NOPASSWD: /usr/sbin/ufw insert 1 allow from any to any port 8080
mmonit  ALL=(root) NOPASSWD: /usr/sbin/ufw delete allow from any to any port 8080
Initial setup:
- Install certbot on the machine where M/Monit is running (available via a package for most platforms like Linux, FreeBSD, etc.)
- A plain HTTP connector is necessary in the M/Monit configuration (conf/server.xml). Add a corresponding port forwarding, between the public port 80/tcp and internal 8080/tcp, so M/Monit will be accessible via http://mmonit.mydomain.com. Note: do not add a secure connector for 8443 yet:
<Connector address="*" port="8080" processors="10"/>
- Start M/Monit
- Request the certificate - execute certbot utility as a user, under which M/Monit is running (e.g. “mmonit”):
 $ certbot certonly \
    -n \
    --http-01-address "M/Monit’s public IP address" \
    -d "M/Monit’s public host name (e.g. mmonit.mydomain.com)“ \
    --work-dir /home/mmonit/letsencrypt \
    --logs-dir /home/mmonit/letsencrypt \
    --config-dir /home/mmonit/letsencrypt \
    --agree-tos \
    --email "your email address" \
    --pre-hook "sudo ufw insert 1 allow from any to any port 8080" \
    --post-hook "sudo ufw delete allow from any to any port 8080; sudo monit restart mmonit" \
    --webroot-path /home/mmonit/current/docroot/ \
    --webroot
Notes: - You can control M/Monit different way (e.g. systemd), just replace the restart command in the example with corresponding command (e.g. systemsctl start mmonit) - The configuration of access to the port 8080 via local firewall in pre-hook and post-hook is optional. Replace the ufw command with corresponding utility for your platform.
- Add the SSL/TLS connector to M/Monit configuration (conf/server.xml):
<Connector address="*" port="8080" processors=“10"/>
<Connector address="*" port="8443" processors="10" secure=“true"/>
<Host name=“mmonit.mydomain.com” appBase="."
  certificate=“/home/mmonit/letsencrypt/live/mmonit.mydomain.com/fullchain.pem”
  certificateKey="/home/mmonit/letsencrypt/live/mmonit.mydomain.com/privkey.pem" >
  ...
<Engine name="mmonit" defaultHost=“mmonit.mydomain.com" fileCache="10 MB" />
- Restart M/Monit
Certificate renewal:
Setup cron to check if the certificate renewal is necessary, once a week (the certbot will renew the certificate by default 30 days before the expiration), crontab configuration for the “mmonit” user:
0 1 * * 0 certbot renew --cert-name mmonit.mydomain.com --work-dir /home/mmonit/letsencrypt --logs-dir /home/mmonit/letsencrypt --config-dir /home/mmonit/letsencrypt
Note: The script will open access to port 8080/tcp during the renewal, so the LetsEncrypt ACME can verify the domain, and close it when the renewal is finished. It will restart M/Monit automatically when the certificate renewal is finished.
Fail2ban configuration for M/Monit
Configuration for fail2ban to block bad bots and authentication failures:
- Enable the access logger in M/Monit conf/server.xml file (the access log is disabled by default):
<AccessLogger directory="logs" fileName="access.log" rotate="month" />
- Restart M/Monit
- Install fail2ban, example for Debian and Ubuntu:
apt install fail2ban
- Append the following entry to the end of /etc/fail2ban/jail.conf:
[mmonit]
enabled  = true
port     = 8080,8443
logpath  = /home/mmonit/mmonit/current/logs/access.log
           /home/mmonit/mmonit/current/logs/error.log
maxretry = 1
bantime  = 48h
- Create a /etc/fail2ban/filter.d/mmonit.conf file with fail2ban filter for M/Monit:
# Fail2Ban configuration file for M/Monit (https://mmonit.com)
# Author: support@mmonit.com

[Definition]

# block:
#   1. bad bots
#   2. collector authentication failures
#   3. GUI authentication failures
failregex = <HOST> .*(GET|POST) .*xmlrpc.* 404
            <HOST> .*(GET|POST) .*/wp-.* 404
            <HOST> .*(GET|POST) .*(?i)webmin.* 404
            <HOST> .*(GET|POST) .*\.php.* (400|404|500)
            <HOST> .*(GET|POST|HEAD) .*\.xml.* (400|404|500)
            <HOST> .*(GET|POST|HEAD) .*\.json.* (400|404|500)
            <HOST> .*(GET|POST|HEAD) .*\.jar.* (400|404|500)
            <HOST> .*(GET|POST|HEAD) .*\.pom.* (400|404|500)
            <HOST> .*(GET|POST|HEAD) /boaform/admin/formLogin.* (302|400|404|500)
            <HOST> .*(GET|POST|HEAD) /formLoginAuth.htm.* (302|400|404|500)
            <HOST> .*(GET|POST|HEAD) /wp-admin/admin-ajax.php.* (302|400|404|500)
            <HOST> .*(GET|POST|HEAD) /ispirit/interface/gateway.php.* (302|400|404|500)
            <HOST> .*(GET|POST|HEAD) /confluence.* (302|400|404|500)
            <HOST> .*(GET|POST|HEAD) /webadm.* (302|400|404|500)
            <HOST> .*(GET|POST|HEAD) /banker.* (302|400|404|500)
            <HOST> .*(GET|POST|HEAD) /zimbraAdmin.* (302|400|404|500)
            <HOST> .*(GET|POST|HEAD) /cgi-bin/jarrewrite.sh.* (302|400|404|500)
            <HOST> .*(GET|POST|HEAD) /admin/cms_channel.php.* (302|400|404|500)
            <HOST> .*(GET|POST|HEAD) /mailingupgrade.php.* (302|400|404|500)
            <HOST> .*(GET|POST|HEAD) /ebook.* (302|400|404|500)
            <HOST> .*(GET|POST|HEAD) /admin/uploads.php.* (302|400|404|500)
            <HOST> .*(GET|POST|HEAD) /free_time.cgi.* (302|400|404|500)
            <HOST> .*(GET|POST|HEAD) /wp-login.php.* (302|400|404|500)
            <HOST> .*(GET|POST|HEAD) /xmlrpc.php.* (302|400|404|500)
            <HOST> .*(GET|POST|HEAD) /boaform/admin/formLogin.* (302|400|404|500)
            <HOST> .*(GET|POST|HEAD) /\.env.* (302|400|404|500)
            <HOST> .*(GET|POST|HEAD) /collector .* 401
            .*Unauthorized, authentication failed for \[<HOST>\].*
            .*\[client <HOST>\] HTTP 501 Not implemented.*

ignoreregex =
- Start fail2ban:
systemctl enable fail2ban
systemctl start fail2ban
- Check status:
# fail2ban-client status mmonit
Status for the jail: mmonit
|- Filter
|  |- Currently failed: 0
|  |- Total failed: 0
|  `- File list: /usr/local/mmonit/current/logs/access.log /usr/local/mmonit/current/logs/error.log
`- Actions
   |- Currently banned: 0
   |- Total banned: 0
   `- Banned IP list:
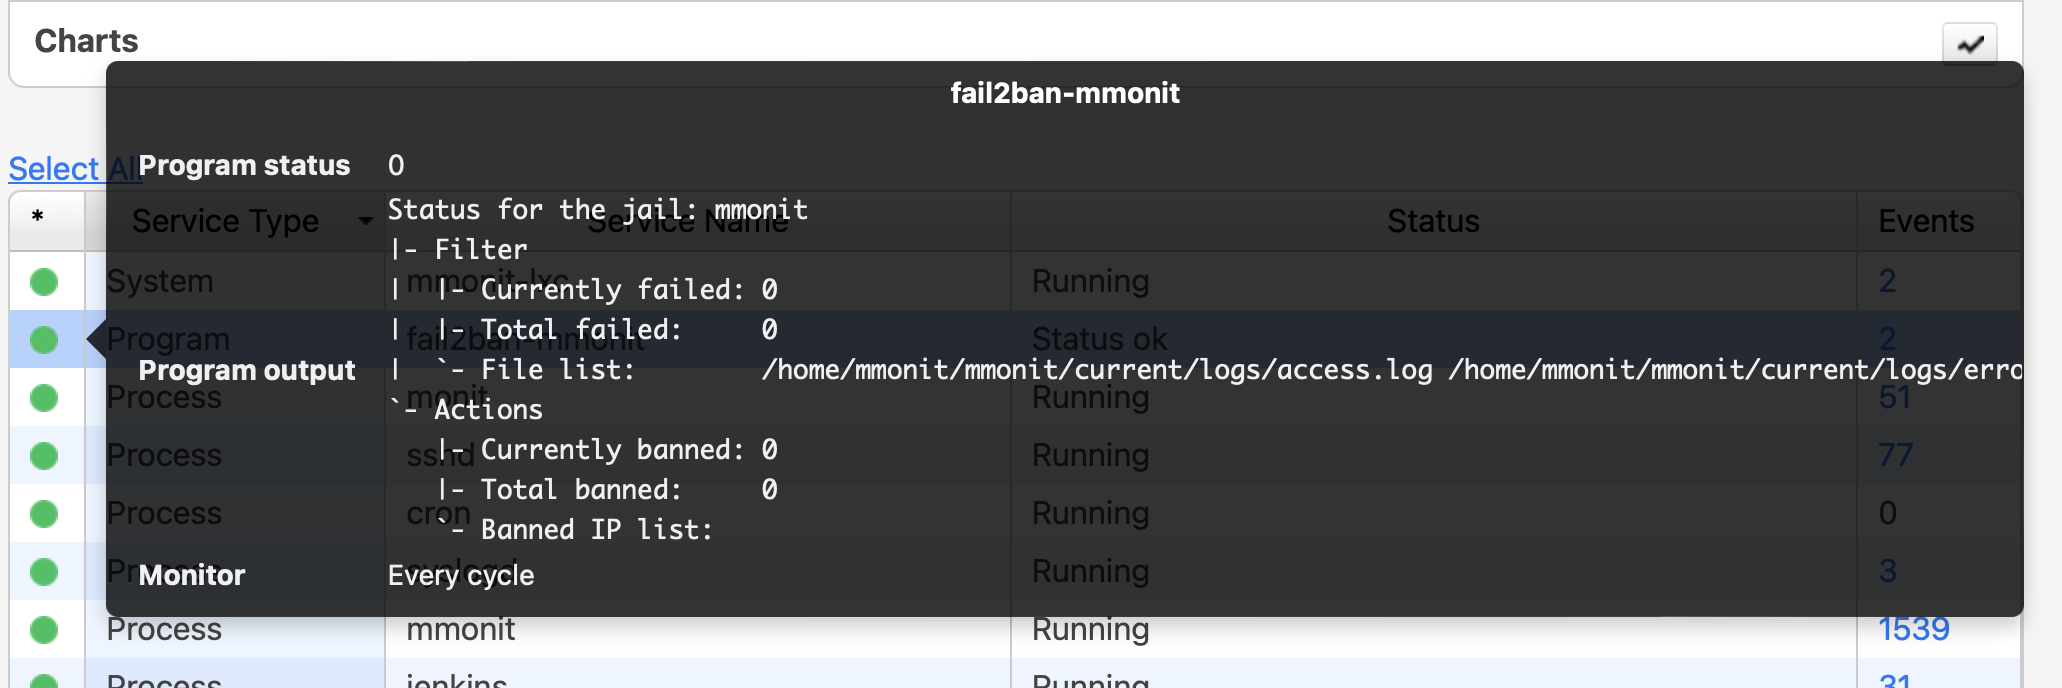
- Optional: monitor fail2ban with Monit and make the list of blocked hosts visible in M/Monit status page. Monit service configuration fragment for e.g. /etc/monitrc:
check process fail2ban with pidfile /var/run/fail2ban/fail2ban.pid
   start program = "/bin/systemctl start fail2ban"
   stop program = "/bin/systemctl stop fail2ban"
   if failed unixsocket /var/run/fail2ban/fail2ban.sock protocol fail2ban then alert
   group fail2ban

check program fail2ban-mmonit with path "/usr/bin/fail2ban-client status mmonit"
   if status != 0 then alert
   depends on fail2ban
   group fail2ban
Now you can get the status via monit CLI or M/Monit status page:
# monit -g fail2ban status
Monit 5.34.0 uptime: 2d 3h 48m

Process 'fail2ban'
  status                       OK
  monitoring status            Monitored
  monitoring mode              active
  on reboot                    start
  pid                          189498
  parent pid                   1
  uid                          0
  effective uid                0
  gid                          0
  uptime                       3m
  threads                      7
  children                     0
  cpu                          0.4%
  cpu total                    0.0%
  memory                       0.0% [22.5 MB]
  memory total                 0.0% [22.5 MB]
  security attribute           lxc-container-default-cgns (enforce)
  filedescriptors              9 [0.9% of 1024 limit]
  total filedescriptors        0
  read bytes                   2.2 kB/s [2.5 MB total]
  disk read bytes              0 B/s [1.4 MB total]
  disk read operations         1.8 reads/s [815 reads total]
  write bytes                  4.4 kB/s [1.0 MB total]
  disk write bytes             2.2 kB/s [340 kB total]
  disk write operations        1.1 writes/s [287 writes total]
  unix socket response time    0.735 ms to /var/run/fail2ban/fail2ban.sock type TCP protocol FAIL2BAN
  data collected               Tue, 30 Jan 2024 14:30:47

Program 'fail2ban-mmonit'
  status                       OK
  monitoring status            Monitored
  monitoring mode              active
  on reboot                    start
  last exit value              0
  last output                  Status for the jail: mmonit
                               |- Filter
                               |  |- Currently failed: 0
                               |  |- Total failed: 0
                               |  `- File list: /usr/local/mmonit/current/logs/access.log /usr/local/mmonit/current/logs/error.log
                               `- Actions
                                  |- Currently banned: 0
                                  |- Total banned: 0
                                  `- Banned IP list:
  data collected               Tue, 30 Jan 2024 14:30:47
M/Monit status page: