Table of Contents
- Host doesn't show up in M/Monit (reset monit ID)
- Jabber "Authentication failed"
- Systems settings and scaling
- M/Monit Software Version Scheme
- License Quota
- How to redirect M/Monit http to https
- How to login to M/Monit with Basic Authentication
- How to reset the M/Monit admin user
- How to use Gmail to send alerts from M/Monit
Host does not show up in M/Monit (reset monit ID)
Keywords: mmonit settings configuration host top
Each Monit instance is identified by a unique ID, stored in the file, $HOME/.monit.id on the host running Monit. $HOME is the home directory of the user running Monit. This file is automatically created at startup by Monit if it does not exist. Care should be taken not to delete or change this file as the ID is used to pair messages from Monit with a host entry in M/Monit.
If the ID file is duplicated on multiple machines (this can happen if you clone the system including the Monit ID file) then several Monit instances will update the same host entry in M/Monit.
If this is the case, you will need to change or generate a new Monit ID file for those machines that does not show up in M/Monit:
- Stop monit on the host with the duplicate ID
- Change the Monit ID: use monit -r to reset the ID.
- Start monit (it will automatically update M/Monit with the new ID)
Jabber "Authentication failed"
Keywords: jabber auth login top
M/Monit use the SASL PLAIN authentication mechanism to login to a jabber server. If M/Monit reports an "Authentication failed" error, please make sure that you have this authentication mechanism enabled in your server. Also make sure that your jabber server software is updated. Several jabber servers (jabberd, prosody, ejabber) have a bug in their SASL PLAIN implementation which only recently has been fixed. For instance, ejabberd before version 2.1.2 had this bug.
Systems settings and scaling
Keywords: mmonit settings configuration scaling top
The sketch below describe the basic architecture of the M/Monit Connector. The Connector is the main processing component in M/Monit and is responsible for reading requests and creating responses. Many more sub-components are in use, but here we focus on the parts of the Connector which are configurable from server.xml via the <Connector> element; in practice, the number of processor threads (processors) and processorTimeout. Of these, the processors attribute is the most important.
Contrary to what one may think, increasing the number of processor threads may not help with scaling nor speed up M/Monit. In fact the effect is often the opposite. The reason is that M/Monit uses locking internally and adding more threads may lead to lock contention, that is, threads may fight over the same lock which can slow down the server. In addition, and to a lesser extent, the OS kernel has to do context-switching between threads, that is, pause a running thread, wake up and start the next thread in the queue etc. This context switching can also lead to a slowdown if there are many threads.
As a rule of thumb we recommend using the following settings in server.xml:
- Set the processor attribute of <Connector> to 10 or to the number of CPU cores on the machine M/Monit is running if this number is higher.
- The Database connection pool defined in <Realm>. Set maxConnections to 25. Adding more connections might only slow down the system.
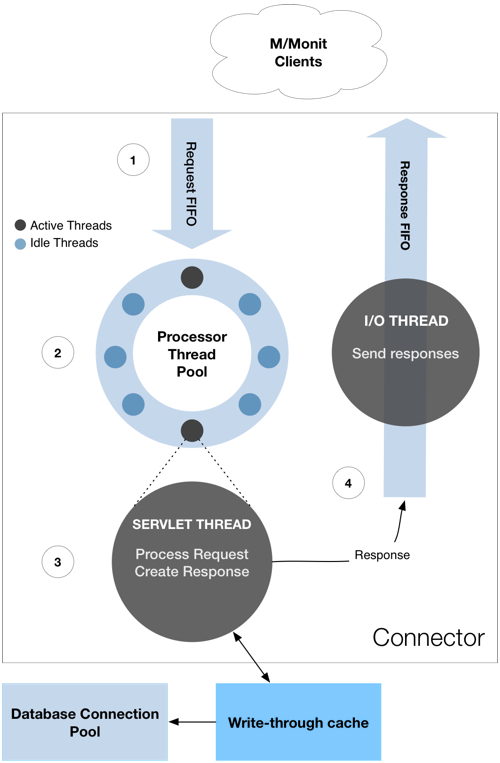
Short description: 1. When a new request is received it is put in a first-in-first-out (FIFO) request queue. 2. The first available processor thread will dequeue the request, process it and create the response. If no threads are available, a new thread is created if the pool contains less than processor number of threads. Otherwise, the request waits in the queue and as soon as a processor thread becomes available it will dequeue and process the first request in the queue. If there are no more incoming requests, a processor thread will hang around for processorTimeout seconds, waiting for more work before it exit. This means that during peak hours, the pool will have max processor threads available to handle requests. and during slow periods, threads will be closed down and thereby reduce the resources used by M/Monit. 3. and 4. Once a response is created it is put on an outbound i/o queue. One I/O thread is used to flush the queue and write output non-blocking. This means that a processor thread works fast because there normally is no read or write i/o done by the thread.
M/Monit Software Version Scheme
Keywords: mmonit version numbers top
The version number scheme used by M/Monit and Monit is, major.minor.revision, for example M/Monit version 3.2.1 . Where Major is a major update to the software, Minor is a small update to the software and Revision is any change made (bug fixes, small updates). Minor and Revision releases are free while Major releases typically requires a License upgrade. M/Monit releases can seen here
How to fix License Quota Exception
Keywords: mmonit license exception top
If your M/Monit license has a Host quota and an extra Host was inadvertently added, M/Monit might fail to restart with a License exception. To correct the problem, you can delete the last host from the database this way:
sqlite:
 cd <mmonit's directory>
 ./bin/sqlite3 ./db/mmonit.db
 PRAGMA foreign_keys = ON;
 DELETE FROM host WHERE id=(SELECT MAX(id) FROM host);
MySQL:
DELETE FROM host ORDER BY id DESC LIMIT 1;
PostgreSQL:
DELETE FROM host WHERE id=(SELECT MAX(id) FROM host);
You should now be able to start M/Monit again.
How to redirect M/Monit http to https
Keywords: mmonit redirect http to https top
M/Monit can be setup to always use https and automatically redirect incoming http connections to https. The first step is to setup M/Monit to use SSL. See the manual to learn how to do this. To setup the redirect from http to https, open the file, mmonit/conf/server.xml and add a second connector on port 80 (the http port) with the redirectPort attribute set to your https connector's port. That is, your service element should consist of two connectors:
 <Service>
    <Connector address="*" port=“80" processors="10" redirectPort="443"/>
    <Connector address="*" port="443" processors="10" secure="true" />
Then open mmonit/docroot/WEB-INF/web.xml and replace all (two places)
<transport-guarantee>NONE</transport-guarantee>
with
<transport-guarantee>CONFIDENTIAL</transport-guarantee>
You are done. Restart mmonit and observe how connections over http is automatically redirected to https.
How to login to M/Monit with Basic Authentication
Keywords: mmonit login basic auth top
You can switch authentication in the M/Monit app from Form Based Authentication to Basic Authentication. To switch, change <login-config> in docroot/WEB-INF/web.xml and restart mmonit.
 <login-config>
     <auth-method>BASIC</auth-method>
     <realm-name>M/Monit Login</realm-name>
 </login-config>
Note that basic authentication does not have a concept of logout and you must restart your browser to logout. The logout button in the UI will only recreate the session and have no effect. Form Based authentication is therefor recommended.
How to reset the M/Monit admin user
Keywords: admin auth login top
- Follow these steps to reset the admin user's password back to swordfish:
- Stop M/Monit
- Connect to the M/Monit database (if you're using the default sqlite backend: sqlite3 db/mmonit.db)
- Execute one of the following SQL statements, based on your M/Monit version:
for M/Monit 3.x:
UPDATE users SET password = "15B29FFDCE66E10527A65BC6D71AD94D" WHERE uname = "admin";
for M/Monit 4.x:
UPDATE users SET password = "#25c25e73e69a57ccf78abd32f29ac9d8#da091173a92116fc7b86990368647f99228cd0b5d993e93248b501e059674b7e" WHERE uname = "admin";
- Start M/Monit
- If you inadvertently have deleted the admin user and need to insert it again with the password ’'swordfish'', follow these steps
- Stop M/Monit
- Connect to the M/Monit database (if you're using the default sqlite backend: sqlite3 db/mmonit.db)
- Execute the following SQL statements.
INSERT INTO users (id, uname, password, fullname, title) VALUES (1, 'admin', '#25c25e73e69a57ccf78abd32f29ac9d8#da091173a92116fc7b86990368647f99228cd0b5d993e93248b501e059674b7e', 'Administrator', 'M/Monit Administrator');
- Start M/Monit
How to use Gmail to send alerts from M/Monit
Keywords: alerts gmail smtp auth top
You can use Gmail's SMTP server to send email alerts from M/Monit. To do this, you will need to create an App Passwords in your Google Account which you then use with M/Monit. This approach can only be used with Google accounts that have 2-Step Verification turned on.
- First login to your Google Account and select Security and click App passwords
- In the Select app dropdown, select "Other" and use e.g. mmonit as the name:
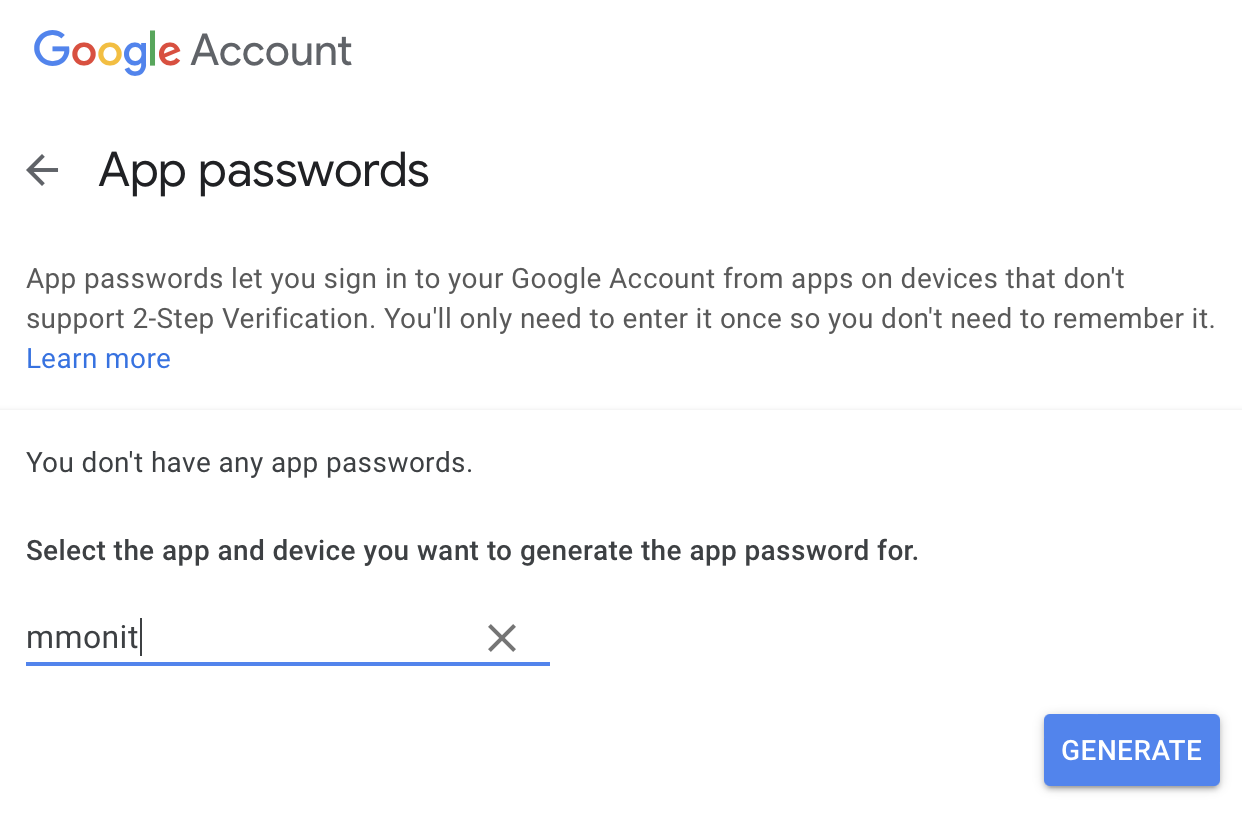
- Click Generate. The password generated can then be used in M/Monit where you setup the mail-server for alerts.
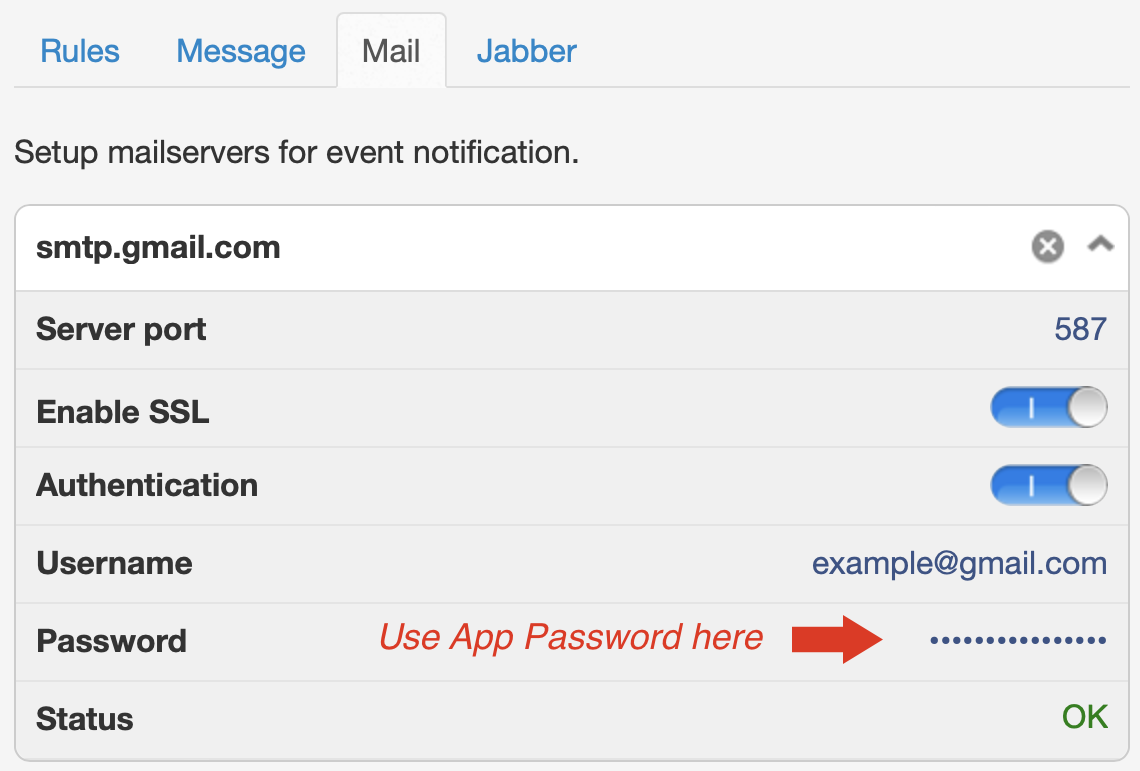
This will enable M/Monit to use Google's SMTP server to send email alerts. Later M/Monit versions will support the more secure alternative, Sign in with Google.